Muovailuvahalla leikkiminen kehittää hienomotoriikkaa, käden lihaksia sekä antaa lapsen luovuuden kukkia!
Alla muutama taikinaohje joita olen vuosien mittaan lapsiryhmieni kanssa kokeillut. Lisäilen reseptejä kun ehdin niitä kirjoittelemaan 🙂
Muovailuvaha viinikivellä (syötävä)
Viinikivi, englanniksi Cream of Tartar on suomessa vähän huonosti tunnettu, mutta erinomainen tuote leivontaan. Muovailuvahan tekoon se on myös erinomainen! Viinikivi saattaa olla hiukan arvokas tuote, mutta suosittelen sijoittamaan siihen. Tähänkin reseptiin tarvitset vain yhden ruokalusikallisen.
Tässä ehdoton oma suosikkini itsetehdyksi, turvalliseksi muovailuvahaksi:
Tarvitset:
2 kuppia vettä
2,5 kuppia jauhoja
½ kuppi suolaa
1 rkl viinikiveä
3 rkl öljyä
*Vaihtoehtoisesti voit lisätä ruokaväriä ja makuja kuten leivontaan tarkoitetut makunesteet tai karkkijauho.
Kiehauta vesi ja aseta se sivuun hetkeksi. Sekoita kuivat aineet keskenään ja lisää siihen öljy. Sekoita sitten kiehautettu vesi seokseen jatkuvasti sekoittaen. Kun seos on viilentynyt tarpeeksi ja muuttunut taikinamaiseksi, jatka vaivaamista käsin – käytä hanskoja jos lisäsit väriaineita!. Vaivaa taikinaa reilun viiden minuutin ajan ja jätä se sitten jäähtymään ja asettumaan kunnolla.
Anna asettua muutaman tunnin ajan ennen käyttönottoa. Säilytä jääkaapissa.
Vinkkejä
Valitse haluamasi kokoinen kuppi ja käytä sitä, itse käytän kahvikuppia
Älä lisää jauhoja vaikka seos vaikuttaa löysältä. Viinikivi tuo siihen elastisuutta, joten suorita prosessi loppuun asti ja anna seoksen jäähtyä. Mikäli seos on vielä löysä, ripottele jauhoa taikinan päälle ja vaivaa sitä
Suolan takia taikina ei ole varsinaisesti herkkua, mutta silti turvallinen syötäväksi
Lisää väri ja makuaineita omien mieltymystesi mukaan tuoksua ja visuaalista iloa varten
Tämä taikina säilyy yllättävän hyvin, joskus omani on kestänyt jopa kuukauden. Aikaa myöten taikina jäykistyy ja siitä tulee tahmeaa. Kun taikinaan alkaa muodostua suolakidettä pintaan, on se aika heittää pois
Taikataikina (syötävä)
Ihana taikataikina tai suolataikina. Tämän taikinan voi paistaa jolloin luomuksenne säilyvät pitkään.
Suhde on 2:1:1, voit käyttää desimittaa, kahvikuppia tai muuta sopivan kokoista mittaa seuraavasti:
2 kuppia jauhoja
1 kuppi suolaa
1 kuppi vettä
1 rkl öljyä
Sekoita ainekset yhteen taikinaksi. Mikäli seos on löysää, lisää jauhoja – mikäli tiivistä, lisää pieni loraus vettä. Anna levätä reilu tunti ennen käyttöä.
Leipokaa haluamanne luomukset. Voitte tehdä esimerkiksi; koriste-esineitä, kuvioita, hahmoja, kehyksiä, leluja, lahjoja ynnä muuta.
Laita valmiit teokset uunipellille leivinpaperin päälle ja paista 125°C noin tunnin verran. Suuremmat teokset saattavat vaatia enemmän aikaa.
Kun luomuksenne ovat jäähtyneet voitte maalata ne.
Kahden ainesosan muovailuvaha
Hoitoaine 1 osa
Maissitärkkelys 2 osaa
*Halutessasi voit lisätä myös väriainetta tai vaikka glitteriä
Valitse haluamasi mittakuppi, itse käytän pientä kahvikuppia. Mittaa 1 kuppi hoitoainetta ja 2 kuppia maissitärkkelystä, sekoita hyvin. Lisää maissitärkkelystä mikäli seos on löysää.
Jos lisäät nestemäistä väriainetta, käytä enintään teelusikallinen ja sekoita se ensin hoitoaineeseen.
Tätä muovailuvahaa käytin harvemmin koska se ei ole syötävää (16 lapsen kanssa on parempi varmistaa ettei satu vahinkoja!). Tekstuuri on kuitenkin hauska joten tätäkin oli kiva kokeilla. Lisäksi tähän pystyi sekoittamaan erilaisia ei-syötäviä aineita kuten glitteri ja helmet.
I think one of the most important things for a child to learn from an early age are Social and Emotional skills. In a classroom setting and at home a child is constantly experiencing different situations and as they deal with these situations they are passively learning some social and emotional skills.
We, as adults, caretakers and teachers however can also take a more active role in teaching a child the social and emotional skills. Conscious teaching and commitment to helping and guiding a child in learning how to cope with different emotions will result in a child who is prepared to cope and master a wide range of situations. The role of the adult is to create such an environment where the child feels safe and has trust in freely expressing the different emotions without filter. Then you can gently guide the child(ren) to learn to understand, adjust and express all the different emotions.
So what are social and emotional skills? How do you teach them and why would you need to learn them?
Some examples of what social and emotional learning can be;
Empathy
Social skills
Self-Awareness
Decisions and choices
Conflict resolution
Relationship skills
Understanding self and others
In the youngest of children it can simply mean understanding the feeling that the child is feeling and as the child gets older, learning to navigate the social situations, understanding the complexity of emotions and showing empathy and willingness to be an active part of a socially functioning group or population.
From an early age it is important to show a child how to cope with the feelings that they experience. We can set up a safe environment for such learning throughout the entire development arch of a child. Actively teaching social and emotional skills will give a child the necessary tools they need to be able to cope in different situations, be resilient, co-operative, adaptive, morally responsible, respectful and so much more.
To the end of this post I would love to gather a library of websites and books which are useful in teaching and learning Social and Emotional skills. Share your favourites in comments or on Instagram or Facebook – sharing is caring!
Scroll down to find the following examples on how to learn social and emotional skills;
Worry the Bear and The Calm Down Tent
Feelings Dice
Emotional Self-Portraits
How do you feel today?
I like / I don’t like / I like to wear
Dodge Cars
Worry the Bear and The Calm Down Tent
A calming down area or space for your child group, classroom or home.
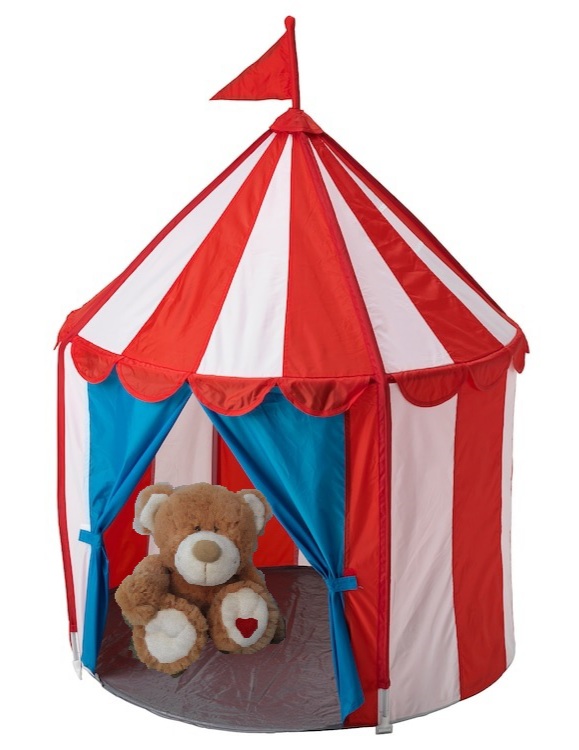
In my preschool group I have always tried to make sure we have space for the individual needs of each child, including a calming down area. One of the most successful ones was Worry the Bear and The Calm Down Tent – an ikea circus tent with a few pillows and a stuffed bear.
When this calm down area was introduced, we told the children that the tent is for calming down and you can whisper all your worries and things that make you unhappy or sad to the Worry Bear living in the tent. We soon did notice that some children would ask for the opportunity to go into the tent themselves when things got hectic and they needed some quiet time – this is of course optimal concerning self-regulation! For others we had to keep suggesting that perhaps a moment in the tent would be beneficial for them. Some kids wanted to go in the tent, others didn’t care for it much and sometimes things got hectic inside the tent too. At those times we had to remind the children what the tent was for.
Do note, that the tent should Never be used as a punishment, it is not a naughty step or a time-out space. The purpose of the Calm Down Tent is to provide a safe place for a child to go and take some time for themselves, regulate their feelings and calm down. Cuddling the Worry Bear calms the body and soul.
Throughout the years I have had all kinds of kids in my group, sensitive ones, quiet ones, wild ones, all kinds! And for each of them I have always tried to offer the opportunity and space to calm down. Just as each child is a unique individual, each one has benefited from such a space in a their own way.
Here some tips for when you introduce a calm down area;
Be thorough in your explanation as to what the area is for
Give real-life examples and role play situations when it would be a good idea to go into the calm down area
Answer all the questions the children have in the coming days – positive reinforcement is key
Make a highlighted effort to guide your group in the use of the calm down area for the first couple of weeks
Only by trial and error will you find the best way to use a calm down area in Your group
The calm down area is meant to be a positive thing, I repeat – never use it as a punishment. A child should always want to go to the calm down area themselves
Worry The Bear you can introduce for example at your morning circle time. You can role-play how you tell your worries to the Worry Bear. Perhaps the Worry Bear has a voice? Perhaps they will answer the children’s questions at circle time? The sky’s the limit in the performance you want to put in when introducing Worry The Bear!
The purpose of this harmless soft toy is to be a safe and gentle tool for a child to reflect upon and to unload their worries. Some of the children will want to tell Worry the Bear everything whilst others will not care for them that much. The children can choose themselves how much they want to interact with Worry the Bear.
What works for you?
Test and feel how the calm down area works in your group and with the children in your group. You know best. Perhaps it will be beneficial to allow children to bring something with them like a book or their own soft toy or lovey. I also had a soft lamp (from ikea) with mood light that the kids loved touching and looking at in the tent.
Each child can bring something different that works for them. The point of the calm down area is to help a child calm down, soothe themselves and self-regulate.
Feelings Dice
Feeling the emotions with the help of a die.
Show the children the all six emotions and name them. Perhaps some of the children already know which emotions they are? Then cast the die and then repeat the emotion you got!
Feel the emotion together, what does it feel like? How does it feel on your face? Does your body posture change somehow? Does the emotion become stronger if you display it with your entire body? Discuss when you might feel such an emotion. Guide the children with these questions, but try to hear them more. Let the children be the leaders of the conversation. Then continue taking turns throwing the die, practise showing the emotion and continue discussing the different emotions.
Take out some mirrors, small ones of big ones, whatever you have available. The children enjoy greatly seeing themselves express these emotions.
Quick fire round; Sit in a circle and take turns throwing the die. Throw the die, express the emotion as fast as possible and give the die to the next one! This is a bit more action packed and great fun for little ones.
This kind of simple practise does two things, the children learn to label these emotions and it sets the tone in the learning environment you are in. An environment where it is safe to express these emotions with the whole group. This kind of activity tells each child that their emotions are welcomed, they may test their boundaries and that it is ok to feel different feelings and express them.
When a child feels safe to express their feelings they will start to understand the range of them and learns to process them in a developing way.
Emotional Self-portraits
Media of choice = Camera – What do you look like when expressing feelings?
Our Emotional Self´portraits! (sorry for the bad quality, I had a bad camera back then)
These emotional self-portraits are fun to do with your group of children. Before this activity and craft, we had already prepared by talking about different emotions, what they are and how they are expressed. We had also practised the above dice game and with mirrors.
We set up a photo session with my preschool group. I gave them different options for emotions “Do sad!”, “Do Happy!” and so on. Some of the children had their own favourites they wanted to have pictured and others needed a bit more encouraging. Some wanted to look in the mirror first and others wanted to just go silly in front of the camera. I tried to get as wide a range of emotions as possible from which we then chose the best ones.
I made a pre-selection (framing, blurriness, repetition, range etc.) and then offered each child a few choices to pick from. Their picture was then glued on an A4 piece of card stock and the children got to decorate the edges. For the benefit of the adults looking at the display I also printed the names of the emotions.
This was a super popular display board for the rest of the school year. We did this towards the end of term 1, Novemberish and it was hung up on the wall until Summer break. I also hung a full-body mirror next to this display as it was so popular amongst the children. They kept on coming back looking at themselves and each other, labeling the different emotions, repeating them themselves and even having full on conversations about the different emotions and the different experiences and stories the children had involving them!
When you physically hang the feelings on the wall, it signals to the child that this is a safe place for it.
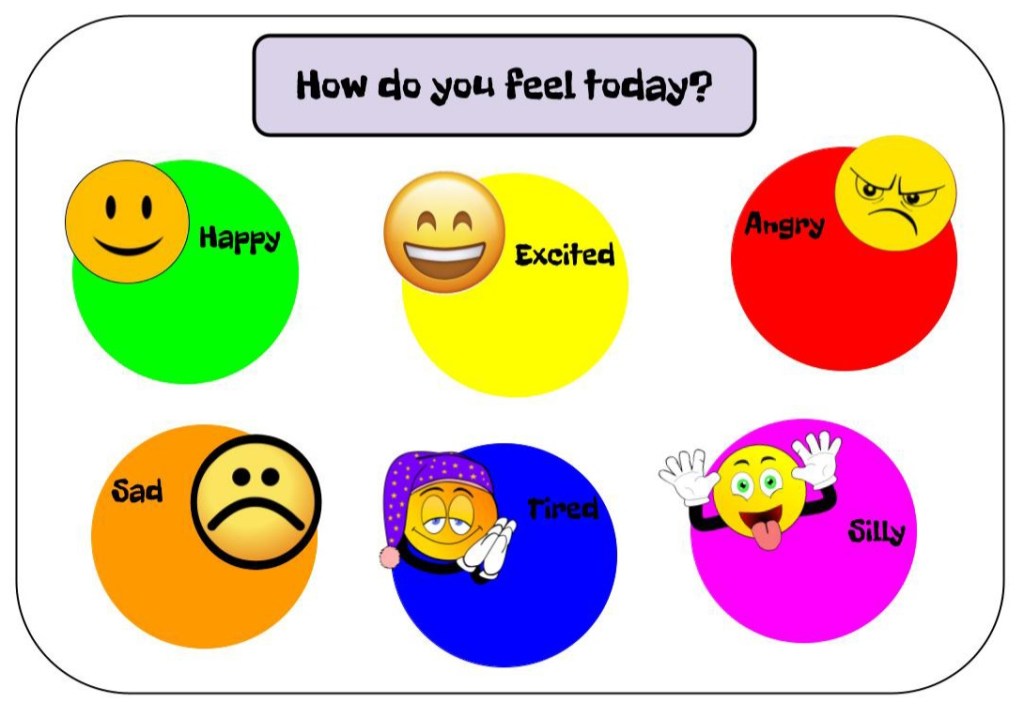
How do you feel today?
Examining your emotion in the morning and in the afternoon.
This display is easy to set up, I had mine hanging right by the entrance as all the children come in in the morning.
You need;
Your choice of emotions (my choice is pictured below)
Same amount of circles or any other shape in cardboard
Picture card of each child (I laminated mine)
Blue-tack
Hang the circles in a visible place with pictures of the emotions (again, the names are in writing mainly for the adults). I had a mini-whiteboard with all the children’s pictures on the side of this where we would place all the pictures before the next day started.
We showed the display to the children and went through all the emotions with them. We had a chat about what the feeling feels like, when you might feel like it and practised expressing them too. We then kindly asked the parents to help their child to place their picture on their chosen emotion each morning.
In the afternoon we would revisit the display and ask the children whether they still feel the same and if not, where they should be moved to? If they wanted to move, we would also then examine a bit as to what were the reasons why they changed? What happened in their day that made them change their emotions? Sometimes happy things happened and sometimes sad things happened, but the children still enjoyed greatly the realisation that throughout the day you can indeed have a range of feelings!
Observations
When we set this up in my classroom, we noticed quickly that we had to reinforce the parents views more than the children. The parents kept trying to convince the children that surely they are happy or excited to come to preschool! But we gently kept on guiding them that the children absolutely do not need to be happy when they arrive, we all have bad mornings sometimes, and perhaps we can do something that will turn that frown upside down. The parents did finally understand that it is ok for their child to arrive just as they are, there’s no need to pretty up anything 😉 Often those parents would then have a happy relief as they arrived for pick up and noticed that their child had moved from sad to silly or from tired to excited. Sometimes it was the other way around and my hope of course is that the children then had a convo with their parents about why the day ended in a sad or tired way.
This activity was a great conversation starter and kept the discussion about emotions alive all the time. We had good talks about how negative can become positive and the other way around. Most importantly we tried to relay to the children that it is ok to come exactly as you are and then pass some tools to them so that they are empowered in their own day.
“I like / I don’t like” and “I like to wear”
Picking and choosing things you like and don’t like.
These are lovely crafts to do with the little ones. We got a pile of magazines and toy catalogues as a donation, so I decided to make this “I like” / “I don’t like” craft.
You need:
Two pieces of card (I used A5 size one rectangle and one cut into a heart)
Pictures from magazines, stickers, newspapers etc.
Fabrics and buttons and/or other things from the haberdashery
Glue
We ripped entire pages of the toy catalogues and pre-cut a variety of pictures. Depending on each child’s scissor skills they could pick the pre-cut pieces or cut their own.
First the children were encouraged to pick pictures that they like. Those were glued onto a heart cut from cardstock. When their heart was full, we asked the children to pick pictures they don’t like and those pictures were glued onto an A5 sized piece of cardstock. I chose on purpose different kinds of pictures from different sources and used the same selection for both the choices.
Perhaps my group just happened to be more positive as I did notice that the “I like” heart was much more full than the “I don’t like” card. Maybe it is more fun to put on things that you like and you don’t really want to focus on things you don’t like anyways, right!
When the cards were finished and the glue had dried, each child got to present one thing from each of their cards to present to the rest of the group explaining what they like most and what they like least and why. The children chose that they did not want to display the “I don’t like” cards, so at the end of the day they were shown to parents and they either ended up in the bin or the children took them home. Perhaps they had a good conversation about it at home?
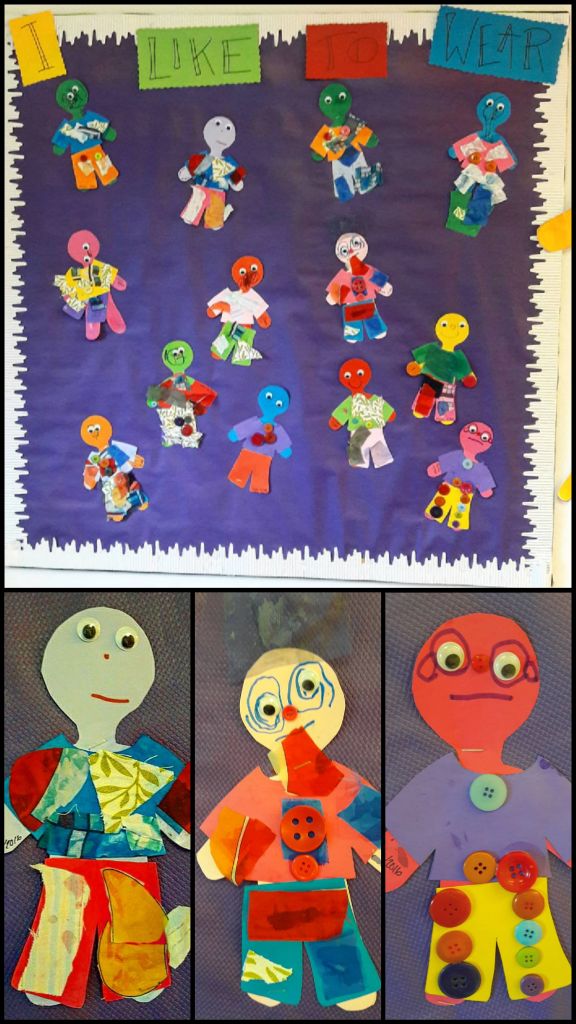
“I like to wear:” – craft is very similar to the “I like” craft. Based on the child’s scissor skills they cut their own human shape paper doll or they used a pre-cut one. We had a pile of different fabrics and buttons that we loaded on the big tables and let the children cut and use as they pleased.
We encouraged the children to choose what they like to wear based on the look and feel of the fabrics; what colours do they like, is there a special fabric feel they like and so on. We assisted the children only when requested in getting the pieces they wanted, for example with getting a certain pattern or size, just to keep encouraging the thinking process and discussion of things they like in these materials. Some of the children took two pieces of fabrics, glued them on and wanted to go play whilst others were carefully choosing colours and shapes and matching things in their own unique way. We even got a few requests at the end of the day if they could add a button here or glue on another piece of colourful fabric.
We were happy to see how the children were observing the clothes they were wearing that day and were discussing with us and each other whether they liked them or not. Some were very pleased with their colour combinations – some were special indeed – some proudly exclaimed that they had chosen their own clothes today! While others bluntly commented that their mom got angry with them and made them wear “this”. 😀
The objective for these “like” crafts was to awaken discussion and study what we like and what we do not like and why. This was also a great way to awaken tolerance amongst the children: Everyone likes different things and that’s ok!
Dodge-Cars
The more polite version of Bumper Cars 😉
A child under the age of 4 has not always quite realised that the world does not revolve alone around them. Here is a great exercise for a gym lesson, it practises the child’s self-awareness, personal space and being mindful and tolerant towards others.
We know Bumper Cars from the amusement parks, right? This is the opposite version of it: instead of bumping into others, you need to Dodge!
This is how:
Define an area – we had a large gym in use, so I used benches and cones to mark the area.
Define the “Parking lot”, for example a bench.
Take as many hula-hoops as you have children in the group.
When you have set up the area, place the hula-hoops on the floor inside the area, apart from each other. Ask the children to go and stand inside one. Before touching the hoops, give the children instructions:
The hula-hoop is your “car” – it is Your personal space
The aim of the game is to Dodge others, avoid touching anyone and all times
You may drive around the space freely, but make sure you do not run into or touch others
Even if by accident you touch another “car”, you have to go to the parking lot to count to ten and then return back to driving around
Notes:
Define a large enough area where the children can easily avoid and dodge each other or send just a small group driving at a time
For some children it is difficult to process that even for an accident you have to go to the parking lot, which is why it is important that you relay to them clearly that the parking lot is not a punishment, it is a reset for your thoughts to make sure that you focus on dodging
If it works for your group, put on some music – driving is always more fun with good background music!
If the game goes well and dodging starts becoming too easy, you can up the difficulty level by making the driving area smaller.
Mitä tunnetaidot ovat ja miksi niitä pitää oppia? Aikuisena tunnetaidot on helppo pitää itsestäänselvyytenä, nehän ovat vain tunteita; vihainen, iloinen ja niin edelleen, ne käsitellään ja sitten jatketaan. Lapsi kuitenkin kiukuttelee, vinkuu, vikisee ja käyttäytyy huonosti jatkuvasti, miksi? Usein se johtuu siitä ettei hän osaa vielä ilmaista tunteitaan muilla tavoin, silloin voit auttaa lasta opettamalla hänelle tunnetaitoja aktiivisesti.
Lapsi tarvitsee ohjausta ja turvallisen mallin tunnetaitojen oppimiseen. Lapset oppivat käyttäytymismalleja ja -tapoja passiivisesti kotona, päivähoidossa, sosiaalisissa tilanteissa ja pelejä pelatessa jatkuvasti silloin kun he luonnollisesti altistuvat näille erilaisille, tavallisille, tilanteille. Me aikuisina voimme aktiivisesti edesauttaa tätä oppimista tarjoamalla lapselle turvallisen kehyksen jossa kaikkien erilaisten tunteiden tunteminen ja käsittely on sallittua. Tällainen kehys voidaan luoda niin kotona, päiväkodissa kuin luokkahuoneessakin lapsen koko kehityskaaren ajan. Oppimalla ja harjoittelemalla tunnetaitoja niin yksin kuin ryhmässäkin, voimme auttaa lasta kehittämään sellaiset tunnetaidot joilla hän pärjää erilaisissa tilanteissa ja hakeutuu tarvittaessa avun piiriin.
Esimerkkejä tunnetaidoista joita voi harjoittaa:
Empatia
Sosiaaliset taidot
Itsetuntemus
Valinnat
Konfliktien selvittäminen
Ihmisten väliset suhteet
Itsensä ja muiden ymmärtäminen
Tämän postauksen loppuun keräisin mielelläni listan hyviä linkkejä ja kirjallisuutta tunnetaitojen harjoitukseen. Laita oma suosikkisi kommentteihin, Instagramiin tai Facebookiin jotka voin laittaa listaan jatkoksi, sharing is caring!
Rullaa sivua alaspäin ja löydät seuraavat harjoitukset ja askartelut, joita voit kokeilla kotona tai lapsiryhmäsi kanssa:
Huoli-Nalle ja Rauhoittumis-Teltta
Tunnenopat
Tunteikkaat Omakuvat
Miltä sinusta tuntuu tänään?
Tykkään / En tykkää / Tykkään pukeutua
Väistely-Autot
Huoli-Nalle ja Rauhoittumis-Teltta
Alue tai tila jossa rauhoittua, harjoittaa itsesäätelyä ja ottaa aikaa itselle.
Ryhmässäni on aina tehty tilaa rauhoittumiselle. Erinäisistä toteutuksista yksi suosituimmista oli parilla tyynyllä pehmustettu Ikean sirkusteltta jossa asui Huoli-Nalle.
Esitellessämme ryhmässäni tämän uuden tilan, ohjastimme lapsille että teltta on rauhoittumista varten ja siellä asuvaa Huoli-Nallea voi halia ja sille saa kuiskia huolensa. Hyvin pian ryhmäni lapset oppivat itse pyytämään mahdollisuutta mennä telttaan rauhoittumaan – joka onkin itsesäätelyn suhteen paras mahdollinen tilanne. Osalle ryhmän lapsista oli vauhdikkaissa tai tunteikkaissa tilanteissa edelleen tarpeellista kehottaa josko hetki teltassa olisi hyvä vaihtoehto? Toiset halusivat mennä telttaan ja toiset eivät. Joskus teltta toimi oivallisesti rauhoittumistilana, toisinaan mopo keuli käsistä pahemman kerran.
Huomioi! Lasta ei koskaan pidä pakottaa telttaan eikä se saa olla rangaistus. Teltan tarkoitus on tarjota lapselle turvallinen tila jossa rauhoittua, harjoittaa itsesäätelyä ja ottaa aikaa itselle. Huoli-Nallea haliessa rauhoittuu sekä mieli että keho.
Ryhmässäni on vuosien mittaan ollut erityisherkkiä lapsia, vauhdikkaita lapsia, hiljaisia lapsia ja muita ihanuuksia. Jokaiselle lapselle on tarjottu mahdollisuus rauhoittumiseen ja aivan kuten jokainen lapsi on uniikki ja yksilö, ovat he myös käyttäneet ja saaneet rauhoittumis-teltasta erilaisia hyötyjä omalla tavallaan.
Muutama vinkki kun aloitat rauhoittumisalueen käytön;
Kerro lapsille kattavasti mitä tarkoitusta varten rauhoittumisen alue on (esim teltta)
Anna esimerkkejä ja rooli-leikkikää tilanteita jolloin olisi hyvä mennä rauhoittumis-telttaan
Vastaa kaikkiin lasten esittämiin kysymyksiin seuraavien päivien aikana
Vain kokeilemalla löydätte sinun ryhmällesi sopivan käyttötavan rauhoittumis-teltalle
Ohjaa lapsia korostetusti teltan käytössä ensimmäisten parin viikon ajan
Rauhoittumis-teltan on tarkoitus olla positiivinen kokemus, älä siis koskaan käytä sitä rangaistuksena – lapsen pitää aina suostua siihen että telttaan meno on hyvä valinta
Huoli-Nallen voit ottaa esiteltäväksi vaikka aamupiirissä. Voit myös rooli-leikkiä tilanteen jossa kuiskaat Huoli-Nallelle omat huolesi. Ehkä teidän Huoli-Nallella on ääni? Ehkä hän vastaa lasten kysymyksiin aamupiirin aikana? Ehkä hänellä on jotain kerrottavaa tunteista? Sinä päätät kuinka kattavan esityksen haluat tehdä esitellessäsi Huoli-Nallen!
Huoli-Nallen on tarkoitus olla turvallinen ja lempeä työkalu lapselle purkaa tuntojaan. Osa lapsista haluaa kertoa Huoli-Nallelle kaiken, toiset taas eivät niin välitä tästä pehmolelusta. Jokainen saa käyttää Huoli-Nallea haluamallaan tavalla.
Lopuksi:
Kokeile ja tunnustele miten rauhoittumis-teltta toimii teille, joillekin lapsille saattaa olla hyödyllistä antaa vaikka kirja luettavaksi tai hän voi ottaa oman (uni)lelunsa mukaan telttaan. Minulla oli myös pehmeä valo-nalle lamppu (ikeasta, yövalo) jossa värit vaihtuivat. Sinä tiedät ja tunnet oman ryhmäsi lapset parhaiten ja tiedät tai opit mikä juuri heille toimii parhaiten. Lapsi voi ottaa telttaan mukaansa melkein mitä vaan, ja se jokin voi olla jokaiselle lapselle jotain erilaista. Olennaista on että lapsi voi rauhoittua ja ottaa aikaa itselleen.
Hyvää rauhoittumisen aikaa!
Tunnenopat
Tunteiden kokeilua ja tunnustelua noppien avulla.
Heitä noppaa ja toteuta heittämäsi tunnetila!
Aloittakaa nimeämällä noppaan kuvatut tunteet. Pelatkaa sitten tunnekierros. Lapset istuvat piirissä ja heittävät vuorotelleen noppaa. Näytelkää tunne joka nopanheitolla tulee. Harjoitelkaa muutama yksinkertainen kierros; heitä noppaa, nimeä ja näyttele tunne.
Kun nopan tunteet ovat jo tuttuja pohtikaa tarkemmin millaisissa tilanteissa tällaisia tunteita tunnetaan? Miltä se tuntuu naamassa? Muuttuuko asentosi jollakin tapaa? Tuleeko tunteesta voimakkaampi kun koko vartalo on siinä mukana? Liittyykö tunteeseen jokin ääni? Kysy nopan heiton lomassa näitä johdattelevia kysymyksiä, mutta anna lasten keskustella asiasta myös keskenään. Ota avuksi myös peili tai monta peiliä ja anna lasten katsella peilistä miltä he näyttävät esittäessään näitä tunteita.
Erityisen hauska on pikaversio jossa tavoitteena on mahdollisimman nopeasti näyttää naamalla ja koko vartalolla nopanheiton tuloksena tuleva tunne! Harjoittaapa tämä vuorotteluakin.
Tällaisen harjoittelun myötä lapsi pääsee kokeilemaan erilaisia tunteita turvallisessa ympäristössä. Aikuinen luo sellaisen tilan jossa lapsi uskaltaa kokeilla rajojaan ja tuntea erilaisia tunteita. Aikuinen voi tämän harjoituksen kautta auttaa lasta tunnistamaan ja nimeämään erilaisia tunteita ja siten käsittelemään niitä kehittävästi.
Tunteikkaat Omakuvat
Mediana kamera – miltä sinä näytät erilaisten tunteiden vallassa?
Tunnekuvat on hauska askartelu oman ryhmän kanssa. Ryhmässäni tätä harjoitusta / askartelua edelsi muutaman päivän keskustelu tunteista, mitä ne ovat ja miten niitä kuvaillaan. Olimme myös harjoitelleet yllä kuvattua tunteilua noppien ja peilien avulla.
Toteutimme lasten kanssa kuvaus-session. Taustana oli iso kartonki ja lattialle oli teipattu rasti jonka päällä lapsi ohjattiin seisomaan. Kuvauksen aikana annoimme lapsille erilaisia ehdotuksia tunteista joita esittää ja toteuttaa haluamallaan tavalla. Jotkut lapsista halusivat katsoa itseään ensin peilistä, toiset halusivat vain hullutella kameran edessä. Yritin ottaa mahdollisimman laajan skaalan kuvia joista sitten valitsimme parhaiten onnistuneet.
Kuvien käsittelyyn menee jonkin verran aikaa, erityisesti kun yrität löytää jokaiselle lapselle eri tunteen. Huomioi tämä siis jo kuvaus-session aikana, älä tarjoa kaikille lapsille samoja tunteita ja kirjoita vaikka paperille laaja valikoima tunteita joista ehdottaa lapsille erilaisia tunteita esitettäväksi.
Jokainen lapsi sai valita suosikkinsa muutaman hyvin onnistuneen kuvan joukosta. Tulostin suosikit ja annoin lapsille A4 kokoisen kartongin. Kuva liimattiin kartongille, ja reunat sai koristella haluamallaan tavalla. Aikuisia varten tulostin myös tekstin, jossa lukee tunnetila jota lapsi esittää.
Tämä oli ihan supersuosittu taulu koko loppuvuoden ajan. Teimme tämän marras-joulukuussa ja se roikkui seinällä kesään asti. Laitoin myös kokovartalopeilin tämän installaation vierelle. Säännöllisin väliajoin ryhmäni lapset kävivät katselemassa omia kuviaan, matkimassa toisia ja irtosipa sieltä muutama mojova keskustelukin erilaisista tunteista. Kun tunteet laittaa fyysisesti seinälle roikkumaan, antaa se lapselle viestin siitä että täällä tätä on turvallista tehdä.
Miltä sinusta tuntuu tänään?
Tarkastellaan tunnetilaa päivän aluksi ja lopuksi.
Tämä tunnekysely meillä oli luokkani seinällä aina alkuvuodesta uuden ryhmän saapuessa. Preschool ryhmäni noudatti jo kouluvuotta, joten laitoin tämän heti koulun alkaessa syyskuussa eteiseen.
Näin se toteutettiin;
Laitoimme seinälle kuusi erilaista tunnetta kuvaavaa ympyrää: Iloinen, Surullinen, Väsynyt, Vihainen, Innostunut ja Hassutteleva. Naamat askartelin itse ja ympyrät ovat kartongista leikatut, teksti on lähinnä aikuisia varten. Jokaisesta lapsesta oli laminoitu kuvakortti jonka voi kiinnittää haluamansa tunteen kohdalle sinitarralla.
Kävimme lasten kanssa läpi nämä kuusi erilaista tunnetta. Miltä ne tuntuvat ja milloin tältä voi tuntua.
Vanhemmilta pyysimme kouluun saapuessa auttamaan lastaan valitsemaan tunnetilan ja kiinnittämään kuvansa sille merkittyyn ympyrään. Iltapäivällä katselimme uudelleen onko tunne edelleen sama vai olisiko syytä siirtää oma kuva jonnekin muualle. Vanhempia pyysimme erityisesti olemaan ohjaamatta lapsensa vastausta liikaa, kaikki tunteet ovat sallittuja. Ajoittain jouduimmekin ohjaamaan vanhempia enemmän kuin lapsia. He yrittivät taivutella lastansa valitsemaan iloisen tai innostuneen ympyrän vaikka lapsi oli väsynyt tai vihainen. Tämä toimi siis oikein hyvänä harjoituksena myös vanhemmille. Ei ole tarpeellista peitellä mitään tunteita, on ihan sopivaa jos lapsi ei halua tulla aamulla preschooliin, ehkäpä pystymme päivän mittaan muuttamaan tämän tunteen?
Tästäpä sitten irtosikin hyviä pohdintoja siitä kuinka tunteet voivat muuttua päivän mittaan, mitkä asiat johtivat siihen että tunteet muuttuivat negatiivisesta positiiviseksi tai toisinpäin ja se, että on täysin hyväksyttyä tulla ja olla juuri sellainen kuin olet.
“Minä tykkään / En tykkää”” ja “Minä tykkään pukeutua:”
Tutkimus asioista joista pidän ja en pidä.
Nämä ovat hauskoja askarteluja 3-5 -vuotiaiden kanssa, mutta soveltuvat kaikenikäisille. Saimme läjän lelukirjoja ja lehtiä lahjoituksena, joten päätin tehdä “Minä tykkään / en tykkää” askartelun.
Tarvitset:
Kaksi A5 kartongin palaa (minulla toinen oli suorakulmio ja toinen leikattiin sydämeksi)
Kuvia lehdistä, mainoksista, lelukirjoista, tarroja ym.
Kankaita, nappeja ym vaatteisiin liittyviä osia
Liimaa
Revimme lehdistä kokonaisia sivuja irti sekä leikkasimme valmiiksi erilaisia kuvia niistä. Lasten saksitaitojen mukaan he saivat joko itse leikata haluamiaan kuvia tai käyttää valmiiksi leikattuja kuvia. Ensin kehotimme heitä valitsemaan kuvia joista he pitävät, ne liimattiin sydämeen. Seuraavaksi kehotimme heitä valitsemaan kuvia joista he eivät pidä, ne liimattiin A5 kartongille. Ehkäpä ryhmäni lapsista kaikki sattuivat olemaan positiivisuuteen taipuvaisia, sillä “en tykkää” kartongille kerääntyi merkittävästi vähemmän kuvia kuin “tykkään” sydämeen.
Kun taideteokset olivat valmiit, lapset saivat koko ryhmän edessä esitellä yhden asian omasta taideteoksestaan josta he pitävät eniten ja miksi ja josta he pitävät vähiten ja miksi. Lapset valitsivat että he eivät halua asioita joista eivät pidä seinälle, joten ne teokset näytettiin päivän päätteeksi vanhemmille ja jokainen sai itse päättää mitä sille tekee. Osa laittoi ne roskakoriin ja osa otti mukaansa. Ehkäpä niistä keskusteltiin kotona vanhempien kanssa?
“Minä tykkään pukeutua:” -askartelu oli samantyyppinen kuin “Minä tykkään”-valinta-askartelu. Saksitaitojen mukaan lapset saivat itse leikata esipiirretyn ihmismuodon tai käyttää valmiiksi leikattua mallia. Meillä oli erilaisia kankaita ja nappeja kerääntynyt joka nurkkaan joten kasasimme ne pöydille ja annoimme lasten valita mieleisensä kankaat joilla pukea paperinukkensa.
Kehotimme lapsia kokeilemaan miltä kankaat tuntuvat, mistä väreistä he pitävät, ja pohtimaan millaiset vaatteet he haluavat paperinukelleen. Avustimme jos he halusivat leikata tietyn kohdan ja annoimme heille runsaasti aikaa valita ja suunnitella haluamansa toteutuksen. Osa liimasi pari kankaanpalaa kiinni ja halusi lähteä leikkimään, toiset valikoivat huolellisesti värejä ja tulipa muutama vielä loppupäivästäkin kysymään josko he voisivat lisätä vielä napin tai tietyn värisen kankaanpalan.
Iloista oli huomata kuinka lapsen huomioivat mitä heillä oli tällä hetkellä päällään, pitävätkö he omista vaatteistaan vai ei, olivatko värit tyydyttäviä tai oliko niissä joku superhieno kuva! Muutama ylpeänä ilmoitti että he ovat itse valinneet asukokonaisuutensa tänään ja toiset kertoivat että koska aamu meni kiukutteluksi, äiti pakotti nämä vaatteet 😀
Molempien askartelujen tavoitteena oli herättää pohdiskelua siitä mistä itse pitää, mistä ei pidä ja miksi. Olipa tämä hyvä harjoitus myös lasten keskinäisen suvaitsevaisuuden herättelyynkin; kaikki tykkäävät erilaisista asioista ja se on ihan ok!
Väistely-autot
Törmäily-autojen kohteliaampi leikkiversio 😉
Alle neljävuotias lapsi ei välttämättä ole vielä ymmärtänyt että maailmassa on muutakin kuin heidän napansa. Tässä erinomainen harjoitus lapsiryhmän liikuntatunnille jolla voi harjoittaa toisten huomioimista, omia rajoja sekä omaa henkilökohtaista tilaa.
Törmäily-autothan on huvipuistoistakin tuttu puuha. Tämä leikki on sen vastakohta, törmäilyn sijaan pitää keskittyä väistelyyn!
Määrittele alue – meillä oli käytössä liikuntasali johon rajasin alueen penkeillä ja merkkitötteröillä.
Merkitse myös parkkialue, esim penkki.
Ota lapsilukua vastaava määrä hulavanteita ja asettele ne lattialle erilleen toisistaan määritellylle alueelle.
Pyydä sitten kaikkia lapsia seisomaan omaan hula-vanteeseen. Ennen vanteisiin koskemista anna ohjeet;
Hula-vanne eli auto, on jokaisen henkilökohtaista tilaa
Leikin tärkein osa on väistellä niin että ei koske ketään muuta
Tilassa saa liikkua vapaasti ja “ajella autoa” mielensä mukaan, mutta muista tärkein osa: väistely
Jos vahingossakin koskettaa toista, täytyy käydä parkkipaikalla laskemassa kymmeneen ja sitten saa taas palata autoilemaan
Huomioitavaa;
Määrittele tarpeeksi suuri alue käyttöön tai lähetä vain osa ryhmästä autoilemaan kerralla, niin että jokaisella on helposti mahdollisuus väistellä toisia
Joillekin lapsille on vaikeaa käsitellä sitä että myös ei-tahallisesta teosta pitää käydä parkkipaikalla – muistuta siis lapsia että myös vahinko on osa leikkiä: parkkipaikka ei ole rangaistus vaan nollaus, jolla ajatukset johdatetaan takaisin keskittymään väistelyyn
Halutessasi voit laittaa musiikkia soimaan – autoiluhan on taustamusiikin kanssa paljon hauskempaa!
Mikäli leikki sujuu hyvin, voit vaikeuttaa sitä rajaamalla aluetta pienemmäksi, jolloin väistely on hankalampaa.
Alla linkkejä ja kirjallisuutta tunnetaitoihin ja niiden oppimiseen liittyen. Kerro omat suosikkisi kommenteissa, instagramissa tai facebookissa!
Every year I make a ‘Friendship Promise‘ with my preschool class. We talk about how to be a good friend, how to respect yourself and others, including everyone and the importance of sharing.
In Finland we celebrate Valentine’s Day as a Friends day, rather than a lover’s day. So this is a great time for a good talk about friendship at home and in class. In my preschool class I would always do this at the beginning of the school year. We had it hanging for the whole school year and that way it was nice to regularly revisit how we have all committed to a common goal of friendship, good atmosphere in the class, respecting each other and doing our best to be good friends to each other.
Friendship Tree
Here we first did some Process art on A4 sized papers. I then helped the children trace their handprint and then cut it (older children can do this themselves).
Friendship Puzzle
I found this template on twinkl.co.uk but it shouldn’t be too hard to make yourself either. I gave each student a piece and asked them to draw “A Good Friend” on it.
Friendship Heart
This is the most simple craft, making a Friendship promise – press everyone’s handprints on a heart and write a little poem around it.
Friendship Fish
Marcus Pfisters “Rainbow Fish” is a lovely story about friendship and sharing. After hearing the story we decided to make our own rainbow fish where on the scales we wrote advise for how to be a good friend.
Friendship Quilt
I helped all my students press their handprints on different coloured cards, with finger paints. The we sewed the pieces together, weaving a friendship quilt. Older kids can of course sew the pieces together themselves, maybe make holes around the edge with a hole punch.
Ystävänpäivä on pian tulossa, mutta tällaisen harjoituksen voi tehdä luokassa tai lapsiryhmässä ihan milloin vaan. Itse tein tämän tyyppisen harjoituksen joka vuosi hiukan koulun alkamisen jälkeen.
Ennen askartelua puhumme siitä, kuinka olla hyvä ystävä? Millaisia asioita voi tehdä ja miten käyttäytyä ollakseen hyvä ystävä. Jopa 3-4 -vuotiaiden ryhmäni osasi jo kertoa moninaisia asioita siitä kuinka sekä pienet että isot asiat edistävät hyvää luokkahenkeä, ystävyyttä ja ymmärrystä sekä kaikkien osallistamista. Nämä roikkuivat luokkahuoneemme seinällä koko loppuvuoden ajan, jossa se muistutti meitä kaikkia aina mukavasti ystävyydestä ja siitä kuinka olemme kaikki sitoutuneet tekemään parhaamme ystävyyden eteen.
Tässä muutama projekti joita olemme vuosien myötä tehneet:
Ystävyyden puu
Muotoilin puun kierrätyspaperista ja pakkausmateriaalista. Kädet teimme maalaamalla ensin prosessitaidetta , jokaisella lapsella oli A4 kokoinen paperi. Pyysin heitä ensin piirtämään kätensä ääriviivan ja leikkaamaan sen sitten irti. Käsistä tuli puuhun lehdet, josta ystävyys voi itää
Ystävyyden Palapeli
Löysin tämän palapeli -templaatin Twinkl.co.uk:sta. Mutta palat on helppo leikata itsekin. Annoin jokaiselle lapsen oman palan koristeltavaksi, teemana; Hyvä Ystävä.
Ystävyys Sydän
Helpoimmillaan “Ystävälupauksen” voi tehdä näin, kaikkien kädenjäljet sydämeen ja pieni runo ympärille.
Ystävyyden Kala
Marcus Pfisterin “Sateenkaarikala” on kaunis tarina ystävyydestä ja jakamisen ilosta. Tämän tarinan perusteella mekin teimme oman Sateenkaarikalamme jonka suomuihin kirjoitimme erilaisia asioita siitä kuinka olla hyvä ystävä.
Yatävyyden Tilkkutäkki
Jokainen lapsi painoi kädenjälkensä sormiväreillä erivärisille papereille jonka ompelimme sitten tilkkutäkkimaisesti yhteen. Vanhemmat lapset voivat ommella itse, paperin reunaan voisi tehdä vaikka rei’ittäjällä valmiit reiät.
You can either use coloured card stock to make a roll of paper or you can paint a toilet paper roll. Make a face on the roll either by drawing or using materials you have at home like googly eyes.
Fold an A4 piece of cardstock from the middle and cut it into a heart, so that the two halves of the hearts meet in the middle. Open the cardstock for ‘wings’, glue the paper roll to the middle of the wings and decorate to your liking!
A Lovely Ladybird
This can also be great scissor practise and fine motor practise for your child.
You need:
Card stock, black and red (or your own choice)
Two paper fasteners
Decorations of your choice (I used stickers to practise fine motor skills too)
Trace both of your child’s hands on the red card stock and cut them loose. Children often love tracing their own handprints so do take some spare paper too so that you can make extra ones 😉 Depending on your child’s age, let them practise their scissor skills and explore their hand prints independently.
Cut a body for the ladybird from black card stock. You can easily make the body by tracing two round objects you have easily available. The bigger one, like a tape roll should be approximately the size of your child’s hand, then it fits nicely when you attach the wings.
Decorate the body and the wings to your liking!
Paper fasteners can be very sharp so be careful when attaching them. Punch a hole to the top of each wing and to the corresponding place on the body, for example with a large needle, then push the paper fastener through. Now you have moving wings!
Heart Hat from a Paper Plate
This is a fun hat for a dress up party or just for the fun of it!
You need:
A Large Paper Plate
Scissor
Decorations of your choice, f.ex. Paint, diamonds, pom poms, whatever you have available
Fold the paper plate in half and cut the middle into a heart as pictured. Then decorate to your liking!
Marbling with Shaving Foam and Paints
You need:
Shaving Foam
Poster Paints
Paper
Two trays
Sticks, f.ex. Bbq stick or lolly stick
A long ruler or other flat stick
Cover the first tray with shaving foam equivalent to the size of your paper. Drop small blobs of paint around the shaving foam and swirl it in with the sticks. When you’re satisfied with the colours, then gently press a paper to the foam. Press firmly so that each part touches the shaving foam, but not too hard so that the foam won’t spill all over.
Place the paper to the other tray and wipe the excess shaving foam off with the ruler.
Let the paper dry.
Once dry, cut some shapes like hearts from your marbled paper and use it for your Valentine’s cards!
Koristeluita kuten tarroja, timantteja, glitteriä, ym.
Liimaa
Maalia
Silmät
Voitte käyttää värillistä kartonkia josta muodostatte paperirullan tai voitte maalata WC-paperirullan. Tee paperirullaan naama piirtämällä tai käyttämällä esim tarrasilmiä.
Taita A4 kokoinen kartonki kahtia ja leikkaa siitä sydän niin että sydämen kantaan ja yhdistävä kartongin pätkä. Avaa kartonki ‘siiviksi’, liimatkaa paperirulla keskelle siipiä ja koristelkaa mielenne mukaan!
Rakastava Leppäkerttu
Tämä on lapselle oivallinen saksiharjoitus sekä halutessanne hienomotoriikan harjoitus.
Meidän ryhmässä tämä oli myös hienomotoriikan harjoitus, siksi koristeluina pienet tarrat.
Tarvitset:
Kartonkia, musta ja punainen
Kaksi haaraniittiä
Valinnaiset koristeet, esim tarroja, glitteriä, silkkipaperia ym
Piirtäkää lapsen molemmat kädet punaiselle kartongille ja leikatkaa ne irti. Lapset rakastavat usein oman kätensä ääriviivojen piirtämistä joten ota varalle myös muuta paperia jolle lapsi voi mielensä mukaan piirrellä lisäkäsiä.
Leikatkaa mustasta kartongista leppäkertun vartalo. Tämä onnistuu helposti vaikka kahden pyöreän tuotteen kanssa, kuten teippirulla ja terotin. Riippuen lapsen iästä, hän voi tehdä nämä vaiheet itse. Pyri ohjaamaan ja avustamaan vain silloin kun se on tarpeellista.
Haaraniitit voivat olla hyvin teräviä joten käsittele niitä varovasti. Tee ensin vaikka neulalla reikä siiven yläosaan ja sopivaan kohtaan vartaloa, laita siitä sitten haaraniitti läpi.
Koristele mielesi mukaan!
Sydänhattu Paperilautasesta
Tässä hauska ystävänpäivänhattu juhlaa varten!
Tarvitset:
Paperilautasen
Sakset
Koristeluita kuten maalia, timantteja, pom pomeja, glitteriä, sydän tarroja ym.
Taita paperilautanen kahtia ja leikkaa siitä kuvan mukaisesti sydän. Koristelkaa mielenne mukaan!
Marmorointi partavaahdolla ja maaleilla
Partavaahdolla marmorointi on helppoa ja nopeaa!
Tarvitset:
Partavaahtoa
Maaleja (akryyli)
Paperia
Kaksi alustaa
Tikkuja, esim grillitikku tai jäätelötikku
Pitkä viivotin tai muu suora lasta
Levitä partavaahtoa koko alustalle ainakin paperin kokoisen alueen verran. Tiputtele haluamianne maaleja partavaahdon päälle ja ‘pyörittele’ se partavaahtoon tikkujen avulla. Paina sitten paperi kevyesti partavaahtoon, ja varmista että jokainen kohta osuu partavaahtoon. Älä paina paperia partavaahtoa vasten turhan kovasti sillä silloin partavaahto pursuaa jokapuolelle.
Ota paperi toiselle alustalle ja pyyhi siitä partavaahto pois pitkän viivottimen avulla.
Anna kuivua.
Leikkaa marmoroidusta paperista vaikka sydämiä tai muita hahmoja ja tee niistä ystävänpäiväkortteja.
Process art for me is the creation of something, anything where the focus is in the process rather than the end product.
As adults we tend to want a child to create something that “makes sense”, things that look like something, like a snowman or a flower. There’s nothing wrong with that, but there is an alternative: Process Art!
In process art you can give a child any tools and let them create the things that they want. The important thing is to provide the child an opportunity to explore, experiment and use their imagination. Sensory things are often a big part of process art, the child gets to feel and learn something new with the materials used. Below are some examples of fun process art experiments.
About paints in the below examples:
I recommend using fairly runny acrylic paints such as poster paint. If you only have thick paint available, add a bit of water to make it runny. The paints have very full colour like this and therefore more visible to use for potential crafts after too 😉
Process Art (part 1) – Unusual painting tools
Normally you use a paint brush or a sponge to make a painting craft with, right? What if you used everything else but those traditional things?
For example; cotton swab, yarn, bbq stick, scrunched up newspaper, cupcake form, strips. Anything you find at home really!
You also need:
Paper
Paints (runny acrylic gives best result)
Work tray
You want to start by putting on an apron and placing some protection on the table the child is working at. Give the child(ren) the unusual painting tools and ask them to make art! If they struggle to get going, show them an example and gently guide them towards the magic of creation. Let the child take their time trying, testing, exploring, experimenting, wondering and making a mess!
Making marks by pressing and rolling (part 2)
You need:
Toys*
Paints (runny acrylic gives best result)
Paper
Work tray
*Choose such toys that can be rolled / driven or that have a fun shape. The toys will be covered in paint, so pick ones where it doesn’t matter 😉
Place the paints for example on paper plates where it is easy for the child to get the wheels and toys in the paint. Place the paints and toys so that they are easily in reach for the child and then let them create different marks on the paper.
Let the child focus on their process!
Box art (part 3)
You need:
An empty box (f.ex. An empty cereal box)
Paints (runny acrylic gives best result)
Toys*
Cover bag
*Pick such toys that are ok to be covered in paint
Let the child choose the toys they want, start with two and see how it goes 😉
Let the child choose paints and pour them in. A good squeeze from a paint bottle will do, you don’t want it too wet but not too dry either. Approximately three tablespoons of each paint will make nice marks.
Close the box with paint and then cover with a plastic or paper bag so that the paint does not fly around.
Allow the child to shake the box as they please – this is the super fun bit!
Open the box together and see if you like what you see. If you so choose, you can put other toys in or add some paint and shake some more!
When satisfied, let the paint dry. When dry, cut the box open and admire the beautiful marks and art!
Prosessitaiteen, engl. Process Art, voisin määritellä vaikka niin, että siinä taiteilun pääroolissa on taidevälineiden ja tuotteiden kanssa työskentely ei lopputuote.
Meille on aikuisina tyypillistä haluta että lapsi luo jotain sellaista jossa on “järkeä”; jotain sellaista joka näyttää joltakin. Eihän siinäkään mitään vikaa ole, mutta on olemassa myös vaihtoehto: Prosessitaide! 😉
Prosessitaiteessa voit antaa lapselle mitkä tahansa työkalut ja antaa hänen luoda niistä haluamiansa asioita. Alla esimerkkejä kokeiltavaksi.
Maaleista:
Suosittelen näissä esimerkeissä käytettäväksi juoksevaa akryylimaalia. Parhain koostumus on muovipulloissa myytävissä askartelumaaleissa. Mikäli käytössäsi ei ole näitä maaleja voit hyvin käyttää myös tuubissa olevia akryylimaaleja. Laita maalia sopivan verran kuppiin ja lisää siihen hiukan vettä, nämä sekoittamalla saat hyvän koostumuksen tähän tarkoitukseen. Muista tarkistaa että maalit ovat
Epätavalliset maalausvälineet (osa 1)
Yleensähän maalauksia tehdään pensselillä, eikös? Mutta mitäpä jos käyttäisitkin kaikkea muuta paitsi pensseliä?
Esimerkiksi: Vanupuikko, lanka, grillitikku, pussinsulkija, sanomalehden sivu rypistettynä, muffinssi vuoka. Oikeastaan mitä tahansa mitä käsiin sattuu!
Tarvitset myös:
Paperia
Maaleja (suosittelen juoksevia akryylimaaleja)
Alustan
Tämä työ kannattaa aloittaa laittamalla essu päälle ja asettamalla pöydälle tarpeeksi suojaa. Anna lapselle maalit ja epätavalliset pensselit ja pyydä häntä luomaan taidetta! Mikäli alku tuntuu vaikealta, näytä lapselle esimerkkiä ja ohjasta hänet lempeästi alkuun. Anna lapsen sitten kokeilla, testailla, ihmetellä ja sotkea itse!
Jälkien teko pyörittelemällä ja painelemalla (osa 2)
Tarvitset:
Leluja*
Maalia (paksua maalia kuten akryylimaali)
Paperia
Alusta
*Valikoi leluja joita voi pyörittää tai joissa on hauska muoto. Lelut tulevat olemaan maalin peitossa joten valitse sellaisia jotka voi pestä tai joissa eivät niin maalitahrat haittaa.
Laita maalit esimerkiksi paperilautaselle josta maalia on helppo saada leluihin. Asettele ne helposti saataville, anna lapselle lelut ja anna hänen sitten luoda erilaisia jälkiä paperille.
Anna lapsen sitten keskittyä ja nauttia prosessista!
Laatikkotaide (osa 3)
Tarvitset:
Laatikko (esim. tyhjä murolaatikko)
Maalia (akryylimaali tai muu paksuhko mutta juokseva maali)
Leluja
Suojapussin
Laittakaa laatikkoon lapsen valitsemat lelut, aloita vaikka kahdella ja katsele miten käy 😉
Kaatakaa laatikkoon sitten lapsen valitsemat maalit ja sulkekaa laatikon suuaukko tai kansi teipillä. Laittakaa vielä ympärille vaikka muovipussi niin ettei maali lennä ympäriinsä.
Anna lapsen heilutella laatikkoa mielensä mukaan!
Avatkaa laatikko yhdessä ja kurkatkaa miellyttääkö lopputulos. Halutessanne voitte laittaa toiset lelut tai lisää maalia laatikkoon ja heilutella sitä lisää!
Vaihda leluja tai lisää maalia
Antakaa maalin kuivua ja lopulta voitte leikata laatikon auki ja ihastella upeita jälkiä ja taidetta!
Joulukortit prosessitaiteesta (osa 4)
Prosessitaiteen tuloksena syntyy jos jonkinlaisia taideteoksia. Voit käyttää näitä värin iloitteluita vaikkapa joulukorttien tekemiseen!
Leikkaa maalatusta paperista vaikka suorakulmioita tai neliöitä ja käytä kortin taustana. Voit myös leikata yhdessä lapsen kanssa yksinkertaisia muotoja kuten ympyröitä ja kolmioita ja käytä niitä sitten joulukuusien, lumiukkojen ja joulupallojen tekoon. Piirrä muoto paperin takapuolelle ja anna lapsen leikata. Mikäli lapsesi on nuorempi, voit itse leikata monimutkaisempia muotoja.
Lisää sitten yksityiskohtia kulta- tai hopeatussilla. Valkoinen värikynä tai liitu näyttää myös tummalla paperilla oikein hyvältä. Käytä koristeluun mitä tahansa sydämenne halajaa!
Who’s got a pile of knitted goods with holes and frayed edges? I do! Here’s a fun way to use those not-good-for-use items.
Painting patterns with knitted socks
Take those broken knitwears and chop them up into smaller pieces. Then use them to paint patterns.
You need:
Knitted socks, the more patterned the more fun
Scissor
Water colours
Water
Paper
A work tray
Cut up the knitted socks into pieces about the size of your child’s hand. Pay extra attention to finding interesting patterns in the different stitches. Perhaps your child has some preferences to what they’d like to try?
Pre-wet the knitted pieces so that they are moist but not wet. Also wet the watercolour palette. Then show your child how to take a piece of knitted pattern, wet it a bit more if necessary and scrub it gently to the water colour of choice so that you get as much colour on the piece as possible. Before pressing the pattern on the paper, stretch it slightly. This will bring out the pattern nicely when you press it on the paper. Press gently and tap a bit on top and marvel the pattern that it became! Try different pieces and different colours and have fun!
Alternatives:
Cut the paper into a jumper and ask the child to decorate it
Cut up the finished product into a jumper or scarf or whichever you want – perhaps into hearts that you can use for a Valentine’s craft
Press patterns on both sides of the paper
What kind of patterns can you make?
Sock-Buddy
A hand puppet from an old sock!
You need:
A sock
Buttons
Needle and Thread or Glue (I prefer to sew as that will hold better)
Imagination!
Sew or glue buttons on the sock for eyes. Fold the tip of the sock into the inside palm of your child’s hand. Sew a few stitches to the edges of the mouth to keep the mouth better in shape. This will help a child manipulate the Sock-Buddy better.
Let your imagination fly with Sock-Buddy! You can practise motoric skills like picking – Sock-Buddy eating, talking – making different voices and story telling – what adventures does Sock-Buddy embark on?
Sock-Buddy can also be a great aid for social and emotional learning. Sometimes it is easier for a child to speak to an inanimate object or an imaginary friend, it can be a sort of a diary for a child who cannot yet write. Sock-Buddy can be a great friend, a good listener and also a good teacher.
Winter images with background
I love the art that kids make and would love to hang every single one of their pieces of work. Here’s a fun way to do up a piece of art!
You need:
White paint
Markers
White paper (a quarter of an A4)
Dark cardstock A4 (black or blue)
Cotton
Glue (liquid and stick)
The theme for this craft in my preschool group was winter sports. We watched different short videos on YouTube of different winter sports. While watching, I encouraged the children to think which one they like the most and why and finally to pick their favourite.
On one table I set up the small white papers and markers and asked the kids there to make a drawing of their favourite winter sport. On another table I set up blue cardstock papers and white paint with cotton balls, cotton swabs and small sponges and there they were encouraged to make a wintery scene.
I cut up the drawings along the line of each child’s drawing.
When the paint was dry I set up liquid glue and cotton balls on a table and gave the children the option to add cotton to their painted blue papers. Finally we glued on their drawing of their favourite winter sport with stick glue on top.
Hang when dry!
Melting Ice – A science project and treasure hunt
How does ice melt? Here’s a fun science project and treasure hunt for all ages!
You need two days for this activity. Day 1 you pick your items and freeze the treasure block and Day 2 you melt it.
You need:
A container* where you freeze the ice block
Water
Freezer or frosty weather
Toys and other treasures**
Tools to melt the ice with***
A tray or other surface where you can melt the ice block
Container*
Any container that you can freeze water in will do; empty juice box, plastic box, rubber glove, empty candy box, pail, bucket etc.
Toys**
Pick such toys that are ok to get broken and have different qualities; heavy and light, soft and hard, big and small. For example; coins, small toys, marbles, pom poms, magnets etc. For extra fun you can also add food colouring and/or glitter!
Tools***
Pick your melting tools based on the child’s age, for a younger scientist choose warm water instead of hot water, and pick blunt tools instead of sharp tools. You could for example use; Salt (sea salt vs table salt, warm or hot water, hammer, knitting needle, shovel etc. Let your child explore, experiment and suggest different tools that they’d like to try.
Do like this:
Day 1 put your chosen items into your chosen container and fill it with water. You can choose to do this together with your child and then you can also look at how things float or sink. Perhaps you want to keep it a secret and have the ice block as a surprise for your child so that it is more of a treasure hunt as they start melting the ice block!
When the block is frozen through put it on a tray where it’s ok for it to melt. You could also take it to the bathroom, shower room or sauna!
Then think of the science of it all – what will melt this ice cube? How can you get the treasures out? What happens when you put salt on it, why does it or does it not melt? Perhaps your child already knows what ice is and how it melts? Let them tell you everything they know and explore as long as they please. Remember to pick tools that are age appropriate and let the child make their suggestions too.
Enjoy the treasure hunt with your little scientist!
Snow Painting
Painting snow is a great sensory and motor skill practise!
You need:
Snow
Shovel
Tray with edge
Water colours
Paint brush
Water
Shovel some snow on a tray and then paint it with glorious colours! It’s great fun for the little ones and perhaps big ones too 😉
I recommend to use water as that makes it easier to get started with the water colours. If your child is patient enough you can also just use the melted snow to make the paint brush wet.
Enjoy!
Christmas Leftovers
The candy and chocolate boxes left over from Christmas are perfect for some fine motor practise, organising and categorising.
Take out some small items like pom poms, small toys, candies, lego or duplo pieces or whatever you have available at home. Do note the choking hazard for small children, use age appropriate items and stay with your child as they are doing this activity.
Take some tongs, spoons or clothes pins and then ask your child to place an item to each of the little dedicated places. It is lots and lots of fun!
Art Exhibition or Treasure Chest
Why not also decorate the box? I’m sure you have gift wrap left from Christmas, or you can use napkins or other craft papers. Each child has their secrets, this is a lovely way of making a dedicated treasure box for them. You can also make an art exhibition on the lid of the chocolate box.
Treasure chest, you need:
Paper
Glue*
*I recommend liquid glue especially for the little ones as you can see it easier and it remains liquid for quite a while. Stick glue is perfectly good as well if you do not have liquid glue available.
Ask your child to rip and shred small pieces from the wrapping paper. This is a great activity for finger dexterity, fine motor skills, planning and hand-eye coordination!
Then glue those pieces on the box. Shaggy ends can be folded and glued under the lid or cut them off when dry.
Art exhibition, you need:
Paper
Glue
Scissor and/or craft cutter
Cut a hole on the lid so that it becomes a frame. On the Finnish boxes the lid is just bent cardboard spot glued together. Gently separate the two sides to leave a gap. Then cut a hole in the middle leaving a frame.
I made mine on the inside, but you can also make it on the outside so that the work can be displayed to a wider audience!
Decorate the edges with some leftover wrapping paper or napkins. Leave one edge open so that you can keep changing the artwork inside. Inside the box your child can keep their secrets and treasures! Or you can use it for fine motor practise
3D Christmas Wreath
Make a 3D wreath, lovely for christmas or any time of the year! This is great fine motor and scissor practise for the little ones. It requires guidance and patience, but is fun to do. You can use anything you want for decoration and choose whichever colours you like, here’s what I did:
You need;
Green A4 card (printing paper will do just fine too, but card stock is more sturdy)
Silk paper
Stick glue
Liquid glue
Scissor
String
A drinking glass (to help with forming the shape)
Do this:
Fold the A4 green paper almost in half on the long side, leave approximately a 2 cm edge where you fold it as that will give support and sturdiness to the wreath. Cut the folded paper into about 1 cm strips. At then end of the paper, leave a flap to use for glueing the two ends of the wreath together, as pictured below.
Fold the paper into a pipe, glueing the two long, non-cut edges together on top of each other. Take a large drinking glass to help; put glue on the paper and start making it into a pipe from the even end, then use the glass to fold the paper into a circular shape and to help with the two edges getting glued together. Finally put some glue on the flap and glue the two ends of the circle together. See pictures.
Your wreath is now done! Let it dry for a while so that the glue stick properly and then decorate.
I like to use silk paper as it is another learning curve and great practise for fine motor and hand-eye coordination. Put some liquid glue onto a flat surface, like a lid. Rip a good sized piece of the silk paper, scrunch it, dip it and attach it. Put a finger under the strip of the wreath and glue the piece on.
Finally you can make a bow or anything you desire. Attach a piece of string to the top strip and hang it.
Happy yule time!
Textured Snowman
A snowman craft is a wintery classic. This one is all about trying some different textures. For a child this is a great sensory experience with materials they may already be familiar with.
You need:
Dark background paper
Liquid glue
Glue stick or a brush
Sticks (i.e. tooth pick, matchstick)
Coloured paper for hat and scarf (I used a napkin and red card)
Hole punch
White materials*
Wide cup(s) or bowl(s)
A bin plate where you can pour all extra materials
*Go to your pantry and find all things white! For example rice, sugar, sea salt or flour
The aim is to create three circles with glue and then pour your wanted materials on top.
Guide the child to pick three of their favourite materials. You can put a small amount of each different kind into a cup or bowl so your child can feel them and choose the ones they like most. Give the child a dark paper and ask them to draw three snowman circles with glue. Depending on the child’s age you might make the glue circles for them, make an outline with a pencil so they can fill in or let them make the circles independently one by one.
Make a glue circle and pour plenty of your chosen material on top, then make the second one and pour and then the third. Let dry. Keep the bin plate nearby as you can pour all leftover materials into it.
Once dry, personalize your snowman. I made a top hat of red card, the black circles for eyes, mouth and buttons I made with a hole punch from black paper, the scarf is a napkin and arms are toothpicks.
Let the child touch and feel the materials for as long as they want and then let them lead the creation of the snowman in their own pace. Only help them when it is necessary 😉
Painted Snowflake with Tape
An easy craft for the little ones! The snowflake is a challenging shape to make, this way it is reversed. Depending on the age of the child this takes a bit of preparation from the adult, but it is good fun to make it!
You need:
Card stock for background
Tape (painter’s tape is the best as it easily comes off paper, but do experiment with other tapes too)
Paint (Acrylic paint, poster paint, finger paint or other thick paint)
A sponge or paint brush (i.e. make up sponge or cotton) or your fingers
Create a snowflake on the paper with tape. Painter’s tape is easy to cut to suitable size. Let the child try the tape themselves, perhaps you just need to cut it ready for them or maybe they need some guidance with the placing of the tape.
Choose the colours you want and squeeze some on a plate. Paint the whole paper so that not one area is without paint. Let it dry and then remove the tape. This is a fun moment for the child to see how the snowflake forms, so let them do the removal 😉
Should you not have paint available, you can also use crayons; oil based ones leave a lovely strong colour and chalky crayons can be spread with your fingers.